By Dan Reitz
In 1997, I drove my 300F with a friend to Denver to a 300 Meet. Prior to leaving, I purchased a spare generator from a fellow 300 Club member. I had no time to check it out but the seller said it was working when he took it off a Plymouth several years ago, so I felt comfortable with that. It had a single pulley on it so I replaced it with a dual pulley.
All the way to Denver and back to St. George, Utah, where we stayed the night, my original generator worked perfectly. The next day, just as we were getting back on the highway, after breakfast, the ammeter read negative so we got off at the next ramp. After running a couple of tests, I determined that the generator had gone belly up so out came the spare. At first it would not work either but after a couple of minutes of running, it suddenly sprang to life.
About 60 miles from home we smelled a strange odor. Knowing the area, I figured it was an outside smell. A couple of miles later the ammeter went negative again so we stopped to check. We found the source of the odor. This generator had gone belly up also. So I disconnected the leads and we drove the remainder of the trip on battery only. It was OK if there was no load on it.
Well, right then and there I decided this would never happen to me again. The next day I designed a mount for an alternator, fabricated it, installed it and have been happy ever since. Several long distance trips to Sacramento, Tucson and Phoenix and no problems. Even if I had problems, I could simply stop at most any parts store and buy another alternator. Not so a generator.
Since I did the conversion, many persons have asked me to write an article on how I did it so here it is.
The real reason I made a special mount is because the mount for the generator would not permit me to use the standard belts used with the generator. They would have had to be much longer and difficult to find. Ergo, the need for the mount.
It is relatively easy to fabricate the mount. You will need a piece of 3/8" x 1-1/2" strap metal about 10" long. Figure A shows the dimensions for the base mount. Note that the mounting holes to the manifold are elongated to permit forward/rearward adjustment as not all pulleys are pressed on the same distance. If additional movement is necessary, you can hog out the holes with a round rasp. Figure B contains the dimensions for the two ears for mounting the alternator. These are the most time consuming pieces to fabricate. But a little cutting and grinding will get it done in good time. Needless to say, the shaded portions of the drawing are the areas to remove.
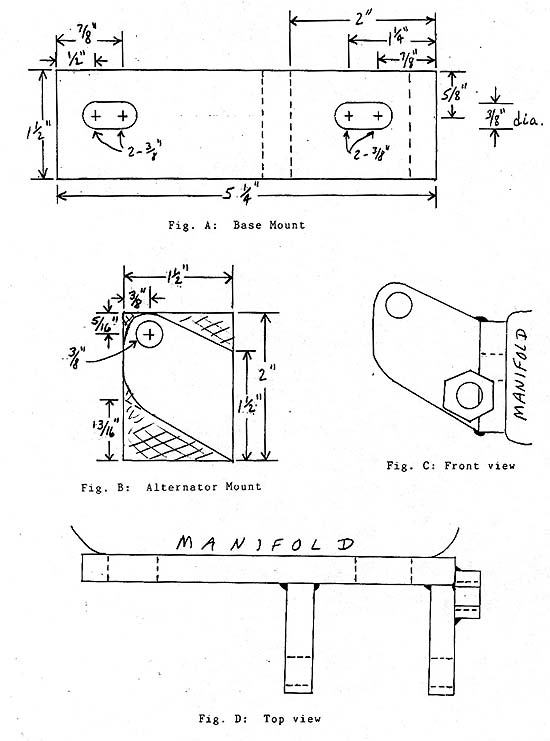
I mounted the ears on the alternator prior to welding them onto the base. I fabricated a spacer to keep them apart and used a couple of "C"clamps to hold them in place on the base mount for welding. Then the alternator was removed. After welding, I rounded the edges and corners and ground off an area to mount the nut as shown in Figures C and D.
To position this nut, I installed the mount and positioned the lower support brackets. I then put a little JB Weld on the nut, placed it in its approximate location and put a bolt through the brackets to position it exactly. 24 hours later, after the JB Weld had cured, I removed the mount and did the final welding of the nut. You will have to purchase a much shorter stud than the original and a matching nut. I purchased a hardened stud and nut. You can also drill through the bolt hole and into the ear and thread it to get more thread depth.
After grinding off any sharp edges the mount was installed and the alternator mounted along with the belts. Depending upon the alternator, you may have to do a little grinding here and there to make it move through an adequate arc to mount the belts. For the tensioner bracket, I obtained another one from a wrecking yard as the original one would have to be bent somewhat to fit the slightly different position of the bolt in the alternator. I had decided beforehand that I would not disturb the original equipment on my car just in case I wanted to return to a generator.
After satisfactorily mounting the alternator, I concentrated on the wiring. Again, I did not want to disturb the original equipment. As shown in Figure E, it is a simple task to convert the wiring for the alternator. The leads for the generator were simply installed on the alternator. If a connector was not the same, I took a short piece of wire, a couple of connectors and made an interface. If they were eye connectors, I bolted them together and taped them over, therefore, not disturbing the original.
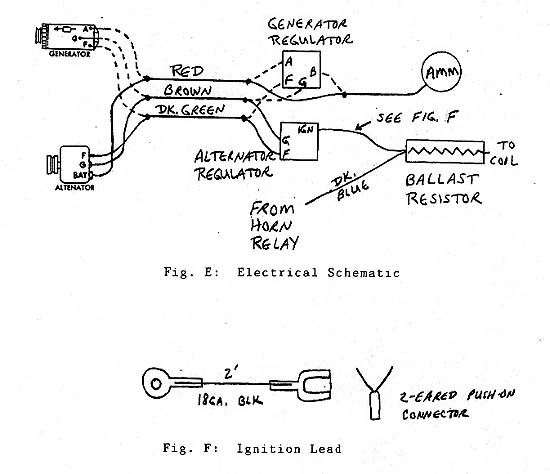
The ground and field leads at the regulator were simply moved to the alternator regulator. The "A" and "B" leads on the generator regulator were bolted together and taped over. For the "IGN" lead from the alternator regulator to the ballast resistor, I fabricated a 2' lead as shown in Figure F. You must install a two eared push-on connector on the ballast resistor to accommodate the extra lead.
Well, with all of the above done, I have a very nice alternator installation and have received a lot of positive comments on it. I do not believe that I will ever go back to a generator system.
Have fun!!!!