by Doug Mayer in case you couldn't tell
This HIDI is the result of people who offered to help me "clean my clock."
They include Rich Barber, Ryan Hill, Ray Jones, and Don Warnaar.
I am grateful for their advice.
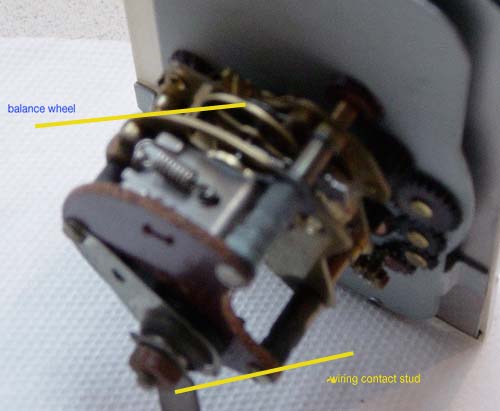
Removal of the clock from a Chrysler dashboard is straightforward and annoying, since there are usually many things in the way of where your screwdriver needs to be. Needless to say, you will remove many parts and pieces before you get to the four screws that hold a clock in place. Behind the face you will see the mechanism--a number of gear wheels, every one tangential to another. Furthest from the face you will see the power connecting stud attached to a single wire that goes to a box that holds the solenoid that powers the clock winder. The balance wheel that is the clock's motion is a brass wheel that is between the solenoid and the clock's face. It and the swing arm that works the gearing that drive the mechanism are fairly delicate. You can start the motion by gently swinging this wheel, but delicacy is the order of operation.
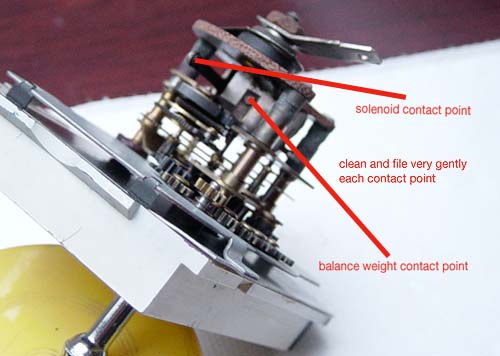
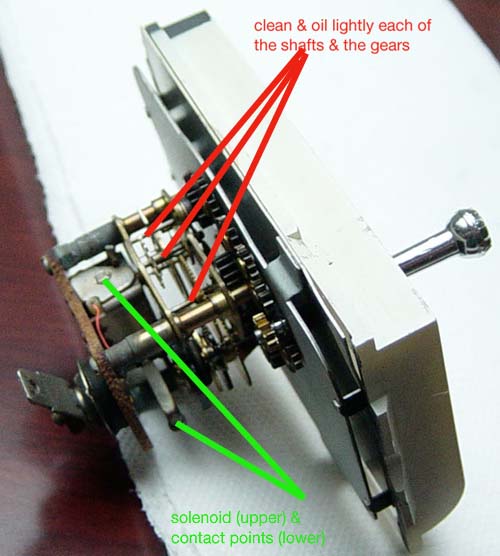
From the top of the solenoid box, an arm protrudes with a tip and a point like the points in a distributor. The arm is about an inch long. On the same vertical plane as that tip or point, you will see its mate, attached to a cog and a fairly complex gear assembly. This is the winding mechanism for an old fashioned wind up clock.
As the clock runs, the lower point, working up from that gear assembly, moves closer and closer to the solenoid arm and point. When the points touch, the solenoid activates and "blows" the lower point to the furthest extent of its range, thereby winding the clock for its next run. These cycles take 2-3 minutes; the only time the clock uses 12V power is when the points close.
Most repairers find that the mechanism is frozen up from years (now 43) of dust and gunk in the works. A careful cleaning of the drive train is in order. Some use a swab of Q-Tips and rubbing alcohol. Getting the cleaner to the gunked up parts is a trick, but careful application and then working the gears will loosen stuff up. Using an air can--the kind to clean a computer keyboard will blow some goo away. Another choice may be some brake and electric motor cleaner, with the little tube. When the works are as clean as you can stand, then a lubricant placed very lightly will make the thing work wonderfully. I used Nut-Z-Lube. A clock repair guy suggested using Gunk's Industrial Chain Lube with Moly. (Sounds inappropriate, but it is thin, so I guess it would be fine.
My clock has been running now for about 15 minutes. (For this I rewind the thing by hand, knowing that the solenoid mechanism works fine electrically). The clock does tick-tock as a mechanical clock should in the quiet of the house. In a Brute it is not likely to be heard. My clock only gets to 53 seconds in a minute's time on a modern, accurate watch. (This would NOT be good news for Meatloaf, who is "Waiting for the end of time." The end of time will take longer to get to with a slow clock!
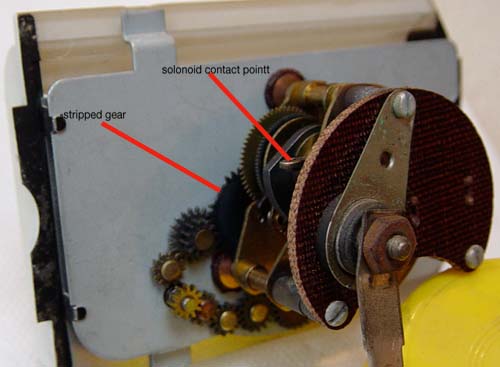
Instructions for adjusting the speed of your clock--and thereby satisfying the Meatloaf test--come from Ray Jones. If the lock is running fast, use the set stem on the face to turn the clock back 24 hours. For slow running clocks, advance the time 24 hours. This will adjust the running spring tension appropriately. ( I was up to this last step--trying to satisfy Meatloaf--when I discovered the 4 stripped teeth on the time set adjustment gearing.
Oh well. I guess the clock will still only be right twice a day, but it will look good, its second, minute and hours hands advancing as they should.)
Once removed from the dashboard, the mechanism is in a housing. The power wire to the clock is a typical female clip that detaches from the stud of the mechanism that protrudes through the housing. The dash light wiring is different, and goes directly to the bulb. No need to fool with that at all. The housing is attached to the clock mechanism and face with bendable dogs (2 on each end, and 1 each on top and bottom. They can be pried open enough to allow removal of the mechanism and face.


To see if they work, ground the metal face plate, and attach a 12V wire to the stud, first putting the points together. (You can carefully and lightly manipulate the gearing cycle that allows the points to close.) If this part of the clock works, the points will "blow" apart. Likely the points are dull and corroded. A very small file or fine grit sandpaper will polish and shape them for better contact.


Back